Welcome to the Elemental Learning Platform!
This platform will guide you to make and use Elemental stents.
Support & contact
Message us on Instagram
Call or text us
Text us on WhatsApp
Let's get started.
Get support from an Elemental specialist
Message us on Instagram
Text us on WhatsApp
Call us at
Send us a message
Thank you! Your submission has been received. We will get in touch shortly.
Oops! Something went wrong while submitting the form.

Make a stent,
step-by-step.

Looking for help?
start a chat
Don't have Elemental yet?
Visit shop
Handling 1
Heat PerioPlast and make a disk.
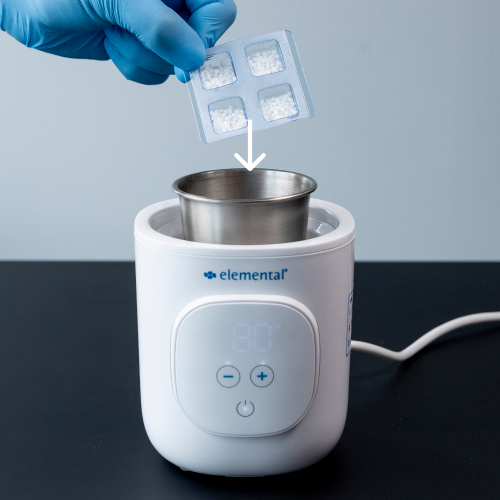
Making the material mouldable
  • Fill both cup & bath to the line with water & place the cup in the bath.
  • Turn on the water bath.
  • Pour 1 whole blister  in
90°C / 180°F water.
  • Stir for 5-10 seconds.
  • Remove the material.
Making a disk
First, apply Vaseline® on your gloves to prevent sticking.
  • With gentle manual pressure, press the material into a disk.
  • Make the disk 2mm / 0.1 inch thin.
  • Push, don't pull. Stretching the material will create uneven thickness.
  • Next, position the disk on the palate.
Handling 2
Push disk onto palate with the tongue & bite down.
Push with tongue
  • Position the disk on the palate.
  • Instruct your patient to press the disk with the tongue onto the palate.
Bite down firmly
  • Instruct your patient to bite down firmly into the disk.
  • Press the material on the buccal side into the interproximal spaces.
Notice the thin bite marks. Biting down will create a comfortable stent with bite function.
Handling 3
Press with your fingers.
Press with fingers
  • For precise palatal adaptation, press the material on the palate with tactile pressure.
  • The blood clot will be stabilized without the need for suturing.
The stent will now set on itself after 1-2 minutes. Remove it when it's solid.
Ready for the next step?
Elemental Intro Kit
€249,-
ex. VAT & shipping costs
Includes:
  • material for 6 cases
  • Chairside water bath
  • Sample to practice
  • Protocols, tips & tricks from expert users
Visit shop

Finishing the stent

Trimming excess material
  • When the stent is set, excess material can be trimmed with scissors.
  • Trim the excess material. This may cause some sharp edges.
When should I trim?
  • When the stent covers the soft palate.
  • When the stent covers the alveolar mucosa.
Smoothening sharp edges
  • Use a heated instrument to stroke over the sharp edges to soften them.

Tips & tricks from the experts

tip by
Prof. Dr. Anton Sculean
Make the stent before the surgery.
  • There’s no blood getting in the way and there's no rush.
  • There’s no Elemental PerioPlast® pressing into the wound.
  • You maintain space & volume to hold and stabilize the blood clot.
  • You have the stent available to place immediately after harvesting the graft.
tip by
Prof. Dr. Thomas Nguyen
Reheat to remodel.
  • By putting the material back in hot water it will become soft again after about 10 seconds.
  • Using a water bath, your water will stay at the right temperature and you can just put the stent back in.
  • If you want to soften sharp edges without remodelling the whole stent, you can heat a metal instrument in hot water and stroke over the edges to soften them.
tip by
Prof. Dr. Gil Alcoforado
Don’t suture the donor site.
  • The stent is available the moment you harvest the graft to immediately protect the site and stabilize the blood clot.
  • Suturing the donor site causes additional pain.
  • Suturing the donor site is quite challenging and increases surgical time.
tip by
Prof. Dr. Markus Hürzeler
Press the tongue to the palate.
  • After heating the material and shaping a disk, you apply the disk on the palate.
  • Let your patient help you by asking them to press the disk onto the palate with their tongue.
  • This will help to create a thin stent which is contoured perfectly to the palate.
tip by
Dr. Homa Zadeh
Bite down hard for stable retention.
  • When shaping the stent, instruct your patient to bite down firmly into the soft material.
  • This will make the material very thin on the occlusal surfaces, creating a comfortable stent with bite function.
  • The patient will be able to take out the stent and click it back in place.
tip by
Dr. Egle Ramanauskaite
Give clear postoperative instructions.
  • Patient adherence: make sure patients don’t remove the stent too early.
  • Make sure they realize the stent is beneficial for their comfort.
Postoperative timeline
  • First day: wear the stent non-stop to stabilize the bleeding.
  • Day 2-5: you may take the stent out once per day to clean it.
  • From day 5: no pain? You can remove the stent.
tip by
Prof. Dr. Andy Temmerman
Only cover the hard palate.
  • To prevent the stent from moving and causing irritation or ulcers, the stent should only cover the hard palate.
  • If the stent extends onto the soft palate, you can easily trim it with scissors.

Ready for the next step?

Elemental Intro Kit
€239,-
ex. VAT
  • material for 6 cases
  • free chairside water bath
  • free sample to practice
  • protocols, tips & tricks
Try it yourself?
Receive a Test Kit at your clinic.
Stock up on Elemental.
Re-order Elemental PerioPlast®